Introduction
In today’s tutorial we will look at an important stage in the rendering pipeline - interpolation, which performs rasterizer on the values that come out of the vertex shader. It was mentioned a little bit about this in the Tutorial 04 in the section about rasterization, and today we’ll see how it works in practice. The answers to the exercises from the previous part are below:
Homework
- We need to set clear color to blue. In RGB model, pure blue color is represented by a triplet (0, 0, 1). Therefore, the change in the code should be following:
glClearColor(0.0f, 0.0f, 1.0f, 1.0f);
- For coloring pixels is responsible fragment shader so we need to make a change there - we need to change te output color fro black to green. Green, in RGB model, is represented by triplet (0, 1, 0). Hence, the change in the fragment shader is following:
fragColor = vec4(0.0f, 1.0f, 0.0f, 1.0f);
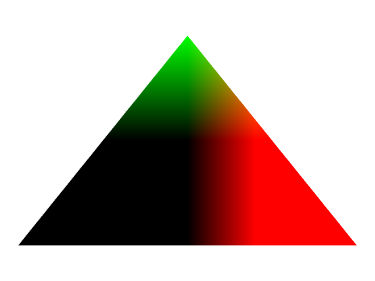
Rasterizer interpolates (averages) values between the three vertices of the triangle, then “visits” each pixel by calling the fragment shader, which returns the color of a pixel, which is written by the rasterizer to the color buffer. Making a long story short, if we have defined a color for each vertex (left-bottom black, right-bottom red, green top) then in the end, final color in these vertices will be respectively: (0, 0, 0), (1 , 0, 0), (0, 1, 0). Then a fragment shader is called, for each pixel on the screen (we are interested in what happens when primitives are being colored), and during this process fragment shader colors the each pixel with averaged value.
The same process is performed for other values, which generally are assigned to the vertices. One of these values are normal vectors that are used for the calculation of light and texture coordinates which replace the color with more sophisticated pattern.
This theory may initially seem strange and confusing so let’s get to the practical part.
Code explanation
There are few code changes and concern only the vertex and fragment shader. Let’s start from the vertex shader:
#version 440

layout (location = 0) in vec3 vertexPosition;

out vec3 pos;

void main()
{
  pos = vertexPosition;

  gl_Position = vec4(vertexPosition.x, vertexPosition.y, vertexPosition.z, 1.0f);
}
There is a new variable pos with the qualifier out, which means that it will be available in the next stages of the rendering process - we will be able to take its values and use, for example: in fragment shader. Then we assign the position to this variable from the input attribute vertexPosition.
Why do we need the position value of the vertex in the fragment shader? Because we want to have different colors on each vertex.
Let’s take a look at fragment shader:
#version 440

in vec3 pos;

out vec4 fragColor;

void main()
{
  fragColor = vec4(pos.x, pos.y, pos.z, 1.0f);
}
There is also a new variable with the same name as in the vertex shader, but with different qualifier. Here it is in, which means that it is a value which enters the shader. It must have the same name as in the shader from which it “comes out”. Here, as consecutive color components we give the coordinates of position of a vertex (each vertex will have different color) and then the center of the triangle will contain averaged colors. As you can see the process of averaging colors for the rest of the pixels is automatic and the rasterizer takes care of it.
The final effect is shown below:

VC++ solution can as usual be downloaded from Source Code section.
Conclusions
I hope that this tutorial brightened you what is interpolation and what is responsible for it. If something is not clear enough, please write to me an email or just to leave a comment below. In the next part of the course we will enter into the third dimension, in which our triangle will evolve into a pyramid!